buy wired door chimes
Last Updated: 26 July 2016 Wired doorbell chimes are the part that makes the bell or chimes ring. There are a lot of different doorbell manufacturers with a lot of different models. The chime units themselves are architectural units and may be quite costly. So fixing them can be worth the effort You have a low voltage wire coming in from the transformer and additional wires coming in from one two or more doorbell buttons. The wired doorbell chimes ring differently for the different doors. One key thing is to check the connections for the low voltage doorbell wiring. An obvious loose or corroded wire should be fixed. The other big question would be, whether or not you are getting power from the transformer. You can use voltage meter to check and see if you have power first to the chime unit from the transformer and then AC power to the transformer. Carefully use the leads on a multi meter or a voltage sensor to see if you have power. A low voltage sensor should be used at the chime unit and the outbound side of the transformer.

A 120V AC sensor can be used at the inbound side of the transformer. Repair faulty wiring when you find it. Remember to turn the power off before messing with the wires. Side Note: A note about testing circuitry. Meters and testers are other tools that you may need from time to time. For as little as twenty or thirty dollars you can arm yourself with a couple of voltage testers and a multi meter. I would suggest a standard voltage tester, a low voltage tester (non-contact testers are the best) and an inexpensive multi meter. Multi meters are a little tricky to use, try these resources for additional information, How to Use a Multi Meter PDF and Using a Multimeter, for more information. With this testing equipment you will be able to trace down what is happening with electrical items in your home. If you find that you have proper current and the buttons are in good order, then it is the chime unit. Time to go to the home improvement store and find another one. Pick out one you like and can afford.

Follow the installation instructions. Presto, you now have a new doorbell and completed your doorbell wiring repair.Make Sure the Power is OFF!!! BEFORE You Work on Electrical Devices!!! Fixing Wired Doorbell Chimes We are headed into uncharted waters here. Not really, but there are a lot of different doorbell manufacturers with a lot of different models. The chime units themselves are architectural units and my be quite costly. Simply put, you have a low voltage wire coming in from the transformer and additional wires coming in from one two or more doorbell buttons.
used roller shutter door for saleThe chimes ring differently for the different doors.
roll up doors pittsburgh paOne key thing is to check the connections for the low voltage wiring.
door locked on whirlpool duet
An obvious loose or corroded wire should be fixed. The other big question would be, whether or not you are getting power from the transformer. You can use voltage meter to check and see if you have power first to the chime unit from the transformer and then AC power to the transformer. Carefully use the leads on a multi meter or a voltage sensor to see if you have power. A low voltage sensor should be used at the chime unit and the outbound side of the transformer.
garage door opener noise isolationA 120V AC sensor can be used at the inbound side of the transformer.
front entry doors memphis tnRepair faulty wiring when you find it.
roll up door delta bc Side Note: A note about testing circuitry.
iron doors online latino
Meters and tester are other tools that you may need from time to time. For as little as twenty or thirty dollars you can arm yourself with a couple of voltage testers and a multi meter. I would suggest a standard voltage tester, a low voltage tester (non-contact testers are the best) and an inexpensive multi meter. Multi meters are a little tricky to use, try these resources for additional information, How to Use a Multi Meter PDF and Using a Multimeter, for more information. If you find that you have proper current and the buttons are in good order, then it is the chime unit. Time to go to the home improvement store and find another one. Pick out one you like and can afford. Follow the installation instructions. Presto, you now have a new doorbell and completed your doorbell repair.Be sure to scroll down... there may be more than one question on this page! You must have an electronic chime, a programmable doorbell type that plays music and lets you change songs or tones.

Electronic chimes require a diode across the doorbell button terminals (which is supplied when youIf this is the case, you probably threw away the diode with the old button. to one brand that I don't know for sure if these diodes are "universal" across manufacturers, so take the cover of your doorbell and do a little brand-specific research to be sure you get the correct diode. The front and rear bells do not always share the same solenoid (a type of magnet that "momentarily" moves a piston or a switch when charged with electricity) and "clapper" within the doorbell. This means that the front bell can be defective while the rear works fine. However, I am sorry to say that there is no economical way to repair common, inexpensive "breadThey must be replaced. When you purchase your replacement, take the old doorbell with you for sizing purposes, or at least measure it before you go shopping. Then you will not have an unpainted or unwallpapered spot on the wall by inadvertently purchasing a

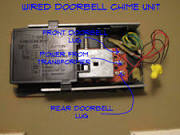
doorbell with too small a "footprint"!Go stand in the corner! Hmmmm. Alright... back to work. too hard on you... I have walked that road myself (and will undoubtedly walk it If your installation is "standard" for one doorbell, the wiring configuration One of the black wires comes directly from the transformer... the doorbell's source of electric power. The second black wire comes from the doorbell button. The twisted pair of white wires are from the (1) other terminal of the transformer and (2) from the second terminal of the doorbell button. The two black wires are attached to the "trans" (transformer) terminal on the doorbell unit and to the "front" or front doorbell terminal. backdoor terminal could be used instead of the "front". will give you different rings for the front and rear buttons so you know which door your visitors (or travelling salesman) are at! "Front" is typically two rings and "rear" is typically one ring on many common, inexpensive mechanical

Then again, yours could play "Hold On, I'm Coming" by Sam and Dave for the front and "Back Door Man" by the Doors for the rear! On a one-button doorbell system it doesn't make a difference which terminal you attach which black wire. I won't get technical here... the simple explanation is that doorbells operate on low voltage AC power, so there is no "positive" or "negative" terminal. Of course, this would not work if you had 3 black wires for a front and rearIn that case you would have to determine which black wire was the transformer wire using a voltmeter set to the AC setting... too many possible wrong combinations to waste time guessing! Touch one voltmeter probe to the paired wires and the other probe to the black wires, one at a time. black wire that gives you the appropriate reading (in your case around 10 volts) is the lead from the transformer and should be attached to the "trans" terminal of the doorbell unit.I didn't forget the twisted pair of white wires.

They don't need to be connected to anything other than each other (how romantic!). Make sure they are held together with a wire nut so they don't accidentally come loose. Hope this is helpful… and not too confusing! Fortunately, this is not a difficult project. Actually, I am surprised that with the emergence of the "Godzilla-sized" home multiple doorbells have notI think it would be rather nifty to have a number of more mellow-sounding tones ringing throughout the house than one brash, brain-scrambling ding-dong from the portal. If you remove the cover from the doorbell, you will see three screwOne is for the front door button, one is for the rear door button, and one is for the transformer. There are other wires that are connected either in the wall behind the unit, or elsewhere, but you need not be concerned withThey are the direct connection between the transformer and the doorbell buttons, providing power to the buttons all the time so that you can, at your

option, use lighted buttons. To connect your second doorbell, just snake a wire to the existing doorbell unit... the hardest part of the job for sure!! The wire should have two or three leads, depending on whether you want the doorbell to ring for just the front or rear (two leads) or both (three leads). There is a generic wire that is calledYou may also use a heavier gauge wire if you prefer. Connect one lead to the front terminal, and one to the transformer terminal. Run these wires to the other doorbell, and connect them to the correspondingNow try to ring the doorbell. If it rings OK, you are done. If you find that the ringing is incomplete or muffled, then you may need to upgrade the transformer (another road trip) to the next higher voltage above the recommended size for the new doorbell. specifications will be in the documentation for the new doorbell. this information, including the size of your current transformer to the hardware

store, they should be able to provide you with the correct product. The first thing to do would be to make sure you are receiving electrical power at the doorbell unit. You will have to test the transformer that supplies power to the doorbell. The transformer reduces the 120v AC electrical power down to around 14v AC to operate the doorbell. You can do this test without locating it by simply testing the wiring at the doorbell unit itself. Take the cover off the doorbell unit and take note of the wiring layout. There should be two or three wires attached to terminals on the doorbell. will be labeled "T" or Trans for transformer. The other one or two will be labeled either Front or Back, referring to the front and back doorbell buttons. You should also see a few additional wires attached together. sometimes there is not enough room under the doorbell unit cover, so these extra wires may be stuffed into the wall behind the unit, requiring you to take the

unit down from the wall to get at them. These are the wires that complete the connection between the doorbell buttons and the transformer, forming a completeWhen the doorbell button is pushed, power flows from the transformer, through the button, and through the chime mechanism, activating a solenoid electromagnet which moves a steel rod. The rod strikes the metal chimes, producing the notorious doorbell "ding" or "dong"... or activates a Remove the electrical tape and/or wire nut on these (hidden) second wires. (Note that only one of them is connected to the transformer, so keep the bundle together or you will have to probe each of them in the following test.) voltmeter set to the lowest AC setting above 20 volts, touch one probe to the second wire bundle and the other to the wire labeled Trans... disconnect it from the doorbell. If there is a reading of 10 or more volts, the transformer is OK. final test of the doorbell unit, touch the second wires to the front and/or rear

terminals on the doorbell unit. If there is a chime, then you have a problem in the wiring of the button(s). If there is no power reading, you must locate the transformer and test itThis can be a chore... sometimes you can trace the wires back to the transformer from either the doorbell unit or from one of the buttons. transformer can be attached to the outside of an electrical box or even to the outside of your main electrical panel. You worst nightmare will be that you have a beautifully finished drywall ceiling in the basement… and someone sealed the transformer underneath without leaving an access panel. Once you locate the transformer, test it again as earlier, but directly onIf there is still no reading, replace the transformer with the same voltage level. If there is power at the transformer but no power at the doorbell unit, you may have a broken or disconnected wire. Check all your wiring and connections to be sure there are no loose or mouse-eaten wires.