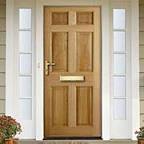
buy 35mm fire doors
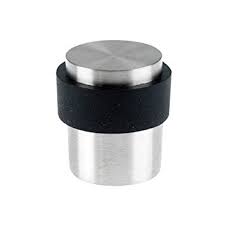
when you choose at checkout. Dispatched from and sold by Chivrose Ltd. Shop for great deals, price discounts and offers on a wide range of tools and supplies from top brands. Shop now in our Deals & Savings Store ZAS85SS Door Stop Floor Mounted Round Collared Flat Top 35mm dia From The Door Handle Store Zoo Projection Door Stop With Rose 70Mm Satin Stainless Steel Robe Hook - SATIN STAINLESS STEEL 35,745 in DIY & Tools (See top 100) in DIY & Tools > Hardware > Door Hardware & Locks > Stops in Home & Garden > Kitchen & Home > Home Accessories > Doorstops Delivery Destinations:Visit the Delivery Destinations Help page to see where this item can be delivered. Date First Available26 Mar. 2013 Would you like to update product info or give feedback on images? Floor Mounted Door Stop 30mmx40mm Satin Stainless Steel. Tough and durable stainless steel finish. DIY & Tools > Hardware > Door Hardware & Locks > Stops DIY & Tools > Substores > Regular Stores > DIY & Tools: Amazon Global Delivery Available
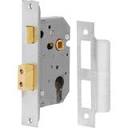
Home & Kitchen > Home Accessories > Doorstops What do customers buy after viewing this item? 5 x Chrome Silver Spring Door Stop Stops Stopper Doorstop Inc Fixings & Screws HDS209-2 SUS304 Stainless Steel Door Stop Wall Mount, Brushed Finish Pack of 2 White Self Adhesive Wall Bumper Buffer Wall Mount Door Stop Protector See all 10 customer reviews See all 10 customer reviews (newest first) Most Recent Customer Reviews Robust, neat and discrete. Exactly what I wanted Good and overall as expected for the price. These look lovely on wood flooring or carpet. Easy to put on. Looks fantastic and was easy to install See and discover other items: round door handles, stainless steel door handlesLocks are an essential aspect of a building as they help keep our belongings and employees or family safe. Purchasing the best lock for a door is a high priority for tradesmen and Toolstation stock a variety of door lock types in our safety and security range.
Browse a vast collection of locks from brands you can trust like Yale, Union, Forge Hardware and ERA locks. Choose 5 lever mortice deadlocks for maximum security with external wooden doors, such as the Union StrongBOLT BS 5 lever deadlock, BS high security 5 level deadlock or the Yale BS 5 lever mortice deadlock available in various finishes. For internal doors, install a 3 lever deadlock with reversible latch for left or right hand doors, and use the rebate kit available in brass and chrome for ease of fitting a deadlock. Alternatively, invest in a sashlock for doors when a key and a handle are required to operate, such as the 3 lever sashlock or BS high security 5 lever sashlock. The Forge keyed alike lock set is ideal if entrance to two doors with one key is needed and is available as a sashlock set or deadlock and sashlock set. For standard levels of security, a euro profile deadlock or euro profile sashlock is suitable and the UNION StrongBOLT euro profile locks are a good option when looking for something that is highly durable.

Indicator bolts are the ideal bathroom door locks for commercial or office buildings. Other popular locks include Cylinder locks, the Yale doormaster PVCu door replacement lock and rim lock with handles for timber doors or sheds. Click and collect from your nearest Toolstation branch or spend over £10 and receive free delivery.User ReviewedHow to Use a Canon A-1 35mm Camera Three Methods:Basic PreparationTaking Photographs with the A-1Unloading your filmCommunity Q&A
fly screen door repairs gold coast The Canon A-1 is a legendary, hugely influential and (for its time) extremely sophisticated late-70s manual focus camera that, like many other 35mm cameras, can be bought extremely cheaply, and gives superb results.
garage door repair tacoma washingtonIf you've bought or inherited one, you may find using one to be a little daunting if you're used to fully-automatic point-and-shoot digital cameras.
upvc door handles sizes
These simplified instructions will guide you through the basics of setting up and using an A-1. Fit your lens if you haven't already. The steps below describe how to fit original FD lenses with a silver locking ring, the kind which were typically sold with the camera at the time. If yours doesn't have this, it's a late-70s-and-onwards "new FD" lens, and the instructions will differ somewhat; in the instructions below, replace the part with twisting the silver locking ring with twisting the whole lens itself until it audibly locks into place. Remove your body cap if you have one, as well as the rear lens cap on the lens. Line up the red dot on the lens with the red dot on the body and gently drop the lens into the mount. Twist the locking ring clockwise, that is, clockwise if you are looking from it from the front. It won't lock into place, but instead it will get progressively tighter. Don't overtighten this, but do make sure it is firmly in place. Turn the camera on.

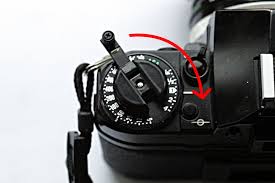
Rotate the main switch from "L" to "A". Canon's manual recommends leaving this at "L" when you're not using the camera to conserve battery life. It might not be worth bothering with this, especially if you're not using one of Canon's power winders for the A-1; just handle your camera carefully (so as not to hit the shutter button) and you'll be okay. Turn on your viewfinder display. Open your viewfinder blind. Uncommonly, the A-1 has a blind on the viewfinder to stop stray light entering the viewfinder on long, tripod-mounted exposures. It's a neat enough feature, but most of the time, you will not need this. If it hasn't been done already, turn the small lever to the left of the viewfinder window clockwise to open the blind.The A-1 is an electronically controlled camera that will not work with a low or dead battery; the shutter will refuse to fire if it is. Press the battery test button (illustrated). If the LED next to the shutter button doesn't blink at all then your battery is dead.

If it does not blink very rapidly (several times per second), then it's low, and you should replace it. Pick up a few cheap 4LR44 (aka A544) cells and replace them.This is just like any other rear-loading SLR. Pull your film rewind knob upwards to open the back of the camera. Place your film in the film chamber, and draw the leader of the film over to sit in one of the slots, and so that the bottom of the leader is engaging the film transport sprocket. Close the back of the camera, push the shutter and then wind the film on. Repeat until the frame counter shows that you're on the first frame. While you do that, watch the rewind knob on the left as you wind the film on on; this should turn as you wind it on, and if it doesn't it probably means your film isn't loaded correctly. Set your film speed. Set your lens' aperture ring to "A". Get up and get out there and take some photographs. The next part of this guide will walk you through using the A-1. Uncover your AT dial.

Set your exposure mode. The A-1 has three modes that you'll be interested in: fully-programmed AE (which is fully automatic), shutter-priority AE, aperture-priority AE and fully manual. Programmed AE will make the camera set both aperture and shutter speeds for you automatically. Turn your mode dial to "Tv" ("Time value", which is Canon's silly name for "shutter priority"), and use your AT dial to select the green "P" as the shutter speed. Most of the time, this will be what you want to use if you're not using your aperture for creative depth of field tricks, or if you're not using your shutter speed to creative effect; it generally does a good job of picking something that works for most photos most of the time. (Sorry, but this is 1978; you can't shift the program.) Shutter-priority AE will allow you to select a shutter speed, and then the A-1 will pick an aperture for you. If you want either very fast or very slow shutter speeds for creative effect, then use this. Turn your mode dial to "Tv" and select a shutter speed.

Remember that the speeds in yellow on the dial are shutter speeds in seconds, the white numbers are ones in fractions of a second. Aperture-priority AE will allow you to select an aperture, and then the A-1 will select a shutter speed for you. Use this if you want to use very wide or very small apertures (i.e. if you want creative control over depth of field). Turn your mode dial to "Av" and select an aperture with the AT dial to get aperture priority AE. Note that this won't allow you to select apertures smaller than f/22, but you shouldn't be doing that anyway. Fully manual exposure is a last resort for using in extremely dim[1] or otherwise impossible lighting conditions. You can select fully manual mode by setting your mode dial to "Tv", selecting a shutter speed, and turning your aperture ring on your lens off "A" and to your preferred aperture. You'll need an external light meter for doing this; the A-1 shows no indication of over- and under-exposure in fully manual mode.

Look through the viewfinder and very gently half-press the shutter button. Your shutter speed and your aperture (either the shutter or the aperture or both or none could be automatically selected) will be displayed in the viewfinder. If either the shutter speed or aperture readouts are blinking, it means you've selected a shutter speed that is either too fast or slow for the largest or smallest apertures on your camera, or an aperture that requires a shutter speed faster or slower than the camera has available.[2] Select a different aperture or shutter speed if this is the case. Set exposure compensation, if required. Press your shutter button. The viewfinder will temporarily blank out and the shutter will fire. If you're using one of the optional power winders, the film will advance itself to the next frame, otherwise, wind it on yourself. Keep photographing until you get to the last frame. Don't pay any attention to the frame counter; you're only at the end of the roll when the winder becomes difficult-to-impossible to wind on (don't force it!), or when your power winder (if you have one) refuses to wind it on any further.
Press the rewind release button on the base of the camera. Flip out the rewind lever on the rewind knob and turn it clockwise to wind the film back into its canister. Open the back of the camera by lifting the rewind knob upwards. Show more unanswered questions Under certain conditions when stopping down the lens, the camera will jam. To remedy this problem, simply press the double-expose lever, advance the frame and the camera will be restored. Many good A-1 cameras have been left for junk because of this design flaw. If you are purchasing one of these cameras second-hand, please fire off a few shots. This camera is notorious for having "shutter squeak" from lubricants getting old or leaving. The fix can be done at a reputable camera service center, but will cost you some considerable amount to do. Check your shutter works before putting a film through it. Among other problems, oil can seep from various mechanisms in the camera and stick the shutter curtains together, causing them to not separate at fast shutter speeds.