bifold door track hardware
2-Door Set Bi-Fold Door Repair Kit Set your store to see localavailabilityBi-Fold Door Hardware Set 170A Series 48 in. 4-Panel Bi-Fold Door Hardware for 12 in. 200FD Series 96 in. 4-Panel Bi-Fold Door Hardware for 24 in. Bi-Fold Door Bottom Pivot and BracketSatin Nickel Plated Bi-Fold Door Knob 170A 4-Panel Bifold Hardware Set, 60 in. Panels (40 lbs. per Panel)Bi-Fold Door Pivot Set Bi-Fold Door Bottom Pivot Bracket Bi-Fold Door Pivot and Guide Set Bi-Fold Door Top Pivot and Guide Wheel 170A 4-Panel Bi-Fold Hardware Set, 96 in. 170A 4-Panel Bi-Fold Hardware Set, 72 in. Bi-Fold Door Top Pivot Bi-Fold Door Top Track Pivot Bracket Satin Nickel Bi-Fold Door Hinge, Pack of 2Nylon Top Pivot and Guides for Bi-Fold Doors (2-Pack) Mill Bi-Fold Door Pull KnobNylon Bi-Fold Pivot and Guide200FD Bi-Fold Door Hardware 125lbs [57kg] Max Panel Weight Each 48" [1219mm] Max Panel Width Each 108" [2743mm] Max Panel Height

1-1/8" [29mm] to 1-3/4" [44mm] Panel Thickness Top Mount Hanger Type Commercial Grade Top Hung Bi-Fold Door Hardware 200FS Side Mounted Bi-Fold Door Hardware 1-3/8" [35mm], 1-3/4" [35mm], 2-1/4" [57mm] Panel Thickness Side Mount Hanger Type 100FD Bi-Fold Door Hardware 75lbs [34kg] Max Panel Weight Each 24" [610mm] Max Panel Width Each 1" [25mm] to 1-3/4" [44mm] Panel Thickness 100FS Side Mounted Bi-Fold Door Hardware
folding sliding doors cad 1-1/8" [29mm], 1-3/8" [35mm], 1-3/4" [44mm] Panel Thickness
upvc patio doors supplied and fitted 111FD Bi-Fold Door Hardware Sets
solid wood doors yorkshire
50lbs [23kg] Max Panel Weight Each 3/4" [19mm] to 1-3/4" [44mm] Panel Thickness 1700 Bi-Fold Door Hardware Sets 40lbs [18kg] Max Panel Weight Each 96" [2438mm] Max Panel Height Residential Grade Top Hung Bi-Fold Door Hardware 1700FS Side Mounted Bi-Fold Door Hardware Sets 3/4" [19mm], 1-1/8" [29mm], 1-3/8" [35mm] Panel Thickness 1825 "Tap-In" Bi-Fold Door Hardware 35lbs [16kg] Max Panel Weight Each 1-1/8" [29mm] to 1-3/8" [35mm] Panel Thickness
garage door installation lansing mi Tap In Pivot/Guide Type
garage doors fife area Residential Grade Bi-Fold Door Hardware
vauxhall astra 3 door for sale glasgow 1601 "Full Access" Bi-Fold Door Hardware

30lbs [14kg] Max Panel Weight Each* Residential Grade Full Access Bi-fold Hardware *Heavier Panels Possible With Optional HingesSkip to main content Simple to install, built to lastThe better engineered your Bi-Fold (by-fold) door hardware is, the smoother the operation of your doors will be—over the lifetime of the installation. Smart homeowners, contractors, and architects insist on KV hardware sets and components to ensure trouble-free installation and reliable performance.We offer a wide range of classic Bi-Fold door hardware sets featuring steel or aluminum tracks in 2- and 4-door configurations. Our tracks accommodate rough openings from three to eight feet and support doors up to 125 lbs.Bi-Fold door hardware is available in kits (by opening length) or individual components. We also offer bulk volume packaging for distributors and high-volume purchasers. Shop Bi-Fold Door Hardware3-Part Architectural SpecificationsSliding Door Hardware BrochureInstall SheetsBi-Fold Catalog Section
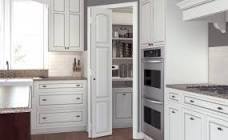
Company Contact Project List You are viewing the website. To change locations, choose a location below Home Designs by Stanley Rope & Chain Accessories Screen & Storm Door Hardware Track, Hangers & Sliding Doors Bifold doors are much like any doors, only connected into pairs with hinges and hung on a track. What makes them look good and work well are a solid, heavy construction and sturdy and carefully adjusted hardware. The heft of the doors is what keeps them from shuddering when you open them. So it's best to look for solid–core or solid–wood doors, which will feel more substantial than hollow–core doors. (Solid doors are also easier to trim if any part of your door opening is out of square.) Then, in order to handle the weight of these heavier doors, you'll need a track that includes a wheeled mechanism, which allows the doors to glide smoothly rather than shimmy along the track. The most difficult—and sometimes most frustrating—part of the installation is attaching and adjusting all the hardware.
The track, the pivots, the hinges all have to be assembled just so, and it's worth taking the time to double–check every measurement and position to be sure each piece is in the right place and facing the right way. Finish or paint the doors before starting. Label the doors to show the order they'll be installed and which sides face out. Take a jamb side door and mark its inner edge 11 inches from the bottom, 7 inches from the top, and centered between the two. Place the door on edge with the marks facing up. Take the lower half of a hinge and align its bottom with the bottom mark, its knuckles facing back and flush to the edge. Use a self?centering bit to drill pilot holes through the hinge holes. Screw on the hinge plate. Attach the top and middle hinges, on their marks. Place the leading (inner) door on edge, facing back-to-back with the first door. Align the doors evenly against a square, then put the hinges together. Screw the hinge plates to the leading door.

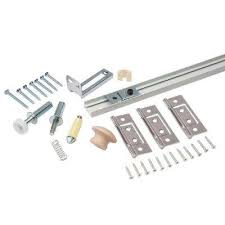
Repeat on the second pair of doors. Attach the track hardware Fasten the pivot plates (the pins that fit into the track and the floor bracket), and the locking arms (the hooks that slide along the track) to the top and bottom of each set of doors. The pivot plates go on the tops and bottoms of the jamb–side doors, and the locking arm on the tops of the leading doors. Each kit requires its hardware to be uniquely positioned, so check the diagrams that come with yours for exact measurements and placements. These will tell you, for example, not only how far a pivot plate should be from the door edges around it but also where its pin should be in relation to the door's edges. Adhering to all the given dimensions ensures that no piece goes on backward. Use a hacksaw to cut the track to length to fit the closet opening. Slide the hanging hardware into the track—the small stops in the center, then around them the track hangers with wheels, and finally the pivot socket on the outside.
Attach the track to the door header with the screws provided. Position the track 1 inch in from the front edge of the header. This will give you enough room to hide the track with trim without limiting the door action. Tip:Don't tighten the hardware onto the track. It will be easier to hang the doors later if the pieces are loose. Position the floor bracket Use the measurements supplied by the manufacturer to position the floor bracket next to the door jamb. Hang a plumb bob from the center of the track above the floor bracket to align the pin hole in the bracket front to back. This will ensure that the doors are plumb when installed. Outline the bracket in pencil to mark its exact location. Screw the bracket in place, then remove the screws and set the bracket and screws aside. Bring the doors to the track and lift the jamb side to hook the pin of the top pivot plate into the pivot socket. Make sure the pin is all the way in, then push the lever on the side of the socket to lock it in place.

Slot the pin from the track hanger into the locking arm on the leading door. Twist the arm to lock it into place. With the doors closed, swing them forward enough to catch the floor bracket in the bottom pivot pin. Attach the floor bracket Swing the doors back into place and align the floor bracket with the pencil marks. Use a flexible bit extender to screw down the bracket. Hang the other set of doors. Close both sets and adjust them along the track to even up the reveal around them. Then, using the wrench provided with the hardware, tighten the pivot sockets on the ends of the track and the small stops in the center. Tip: Ask a helper to give you a hand in lifting and holding the doors, which can be unwieldy. Attach the door aligner From inside the closet and with the doors closed, mount the door aligners between the two leading doors, 6 inches up from the floor. The aligners catch when the doors are closed, keeping the door faces flush with each other.