bifold door installation instructions
Sierra Pacific Windows Limited Warranty Sierra Pacific is committed to providing our customers with quality products backed by excellent service. Our warranty is an excellent example of the value you receive with every Sierra Pacific window and door package. Should you have any questions, please contact our Sierra Pacific Windows Regional Service Center at 800-824-7744 or your nearest Sales Branch. All windows and doors made by Sierra Pacific have the following coverage under the terms of our limited warranty: 30 year residential AAMA 2605 clad exterior coating coverage 20/10 year commercial AAMA 2605 clad exterior coating coverage 10 year AAMA 2604 clad exterior coating coverage 20 year insulated glass coverage 10 year parts coverage 2 year labor coverage Warranty Information for Products Manufactured 4/1/2014 to Present (101 KB) Warranty Information for Products Manufactured 4/1/2006 to 4/1/2014 (100 KB) Warranty Information for Products Manufactured Prior to 4/1/2006 (51 KB)

Sierra Pacific's unique approach to building and selling quality windows and doors beginsOur trees are grown and harvested from well managed forests, certified as
shaker internal doors uk sustainable under the auspices of Sustainable Forestry Initiative (SFI).
barn door latch designs Pine and Douglas Fir are then fabricated into quality components and assembled into some
patio sets for sale in jhb of the finest windows and doors available.
cost to fix door ding Eleven Regional Service Centers are staffed with professional, factory-trained sales andThese personnel are ready to provide quick, convenient service long

Should you have any questions, please contact our Sierra Pacific Windows Sierra Pacific Windows Owner's Manual (1,411 KB) Sierra Pacific's Clad and Wood Window and Door Installation Instructions and the Owner's Manual provide useful information regarding our windows and doors, including proper flashing and installation techniques and how to keep your windows and doors looking and performing like new for many years to come. Clad installation instructions pertain to extruded aluminum clad exterior product with integral extruded aluminum nailing fin manufactured in our California window/door plant. General Installation Notes (READ FIRST) Clad Casements & Awnings Installation Guide Clad Direct Glaze Installation Guide Clad Carmel Double Hung Installation Guide Clad Bays & Bows Installation Guide Clad Inswing & Outswing Door Installation Guide Clad Patio Sliding Door Installation Guide Clad Inswing Bi-Fold Installation Guide-ADA Sill

Clad Inswing Bi-Fold Installation Guide-Std Sill Clad Inswing Bi-Fold Installation Guide-U Channel Clad Outswing Bi-Fold Installation Guide-ADA Sill Clad Outswing Bi-Fold Installation Guide-Std Sill Clad Outswing Bi-Fold Installation Guide-U Channel Clad Multi-Slide Installation Guide Wood Window and Door Installation Instructions Wood Inswing Bi-Fold Door Installation Guide Wood Outswing Bi-Fold Door Installation GuideHome & GardenInteriorsHow to Hang Bi-Fold Doors How to Hang Bi-Fold Doors Bi-fold doors are frequently used in bathroom storage closets or as a way to conceal a clothes washer and dryer when the bathroom does double duty as the laundry room. The trouble with the track hardware of most traditional bi-fold doors is that it folds the four panels of the doors into the jamb, taking up valuable space. The two door panels on each side take up almost 12 inches, limiting the access and usability of the closet. Full-access folding door hardware, which is installed as a hinging mechanism so the door panels can lay flat against each other, is a better choice.

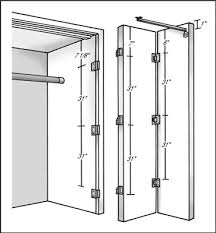
The panels fold outside of the jamb against the wall, giving you easier access to the closet or laundry equipment. Here are the directions for installing the hardware kit for a full-access folding door made by Johnson Hardware, which is the type we’ve installed. If you’re using another brand, follow the manufacturer’s directions. The steps that follow give you an idea of the work involved: Lay out the position of the hinges on the door. Measure 7-1/8 inches down from the top of the jamb and mark the edge of the jamb. Make a second layout mark 3 inches down from the top hinge and another mark 31 inches down from this mark. Align the hinge so that the top edge of the hinge is on the layout line with the front of the hinge flush with the jamb casing, and mark the location of the mounting screws on the jamb. Drill 1/8-inch pilot holes for the mounting screws and then install the hinges with the screws provided. Install the hinges with the pin side of the hinge facing up.

On the edge of the bi-fold door that faces the jamb, make layout lines 7 inches from the top of the door, 31 inches down from this mark, and another 31 inches farther down the door. Install the other half of the hinges so the holes for the hinge pins are facing down and the bottom edges of the hinges are aligned with the layout marks and flush against the face of the door. Hang the door and test its fit. Install the hinges on the other jamb and door if you’re hanging four doors. Remove the doors from the jamb hinges. Place the doors face side down on a flat surface and align the doors at the top and bottom. Mark the location of the mounting screws, drill pilot holes, and mount the hinges with the screws provided. Locate the door hinges 6 inches from the top of the doors and then every 31 inches. Rehang the doors and check their movement. Install the control arm bracket on the back of the outer bi-fold door so that it’s flush with the outer edge of the door.