best adhesive for garage door threshold
Video Playback Not Supported Door sills on entry doors can rot and deteriorate over time due to exposure to the elements. Use pressure treated or rot resistant wood when replacing door sill. To Remove and Replace a Door Sill: Pull the rubber gasket out of the grooves on the metal threshold. Remove the screws holding the metal threshold in place. Cut the rotten door sill into pieces using an oscillating tool or circular saw. Remove the old door sill from beneath the door frame. Position the old door sill on the new sill, and trace around it. Cut the new door sill to size, and bevel the outer edge. Fit the new door sill in place under the door frame. Hold the new door sill in place with construction adhesive and fasteners. Caulk around the outside of the door sill. Paint or stain the new door sill. Replace the metal threshold and attach it with screws. Insert the rubber gasket in the metal threshold grooves. Watch this video to find out more.

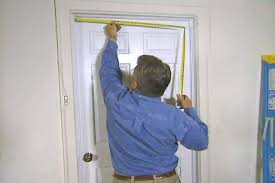
How to Remove and Replace Exterior Door Casing (video) Replacing Worn Weather stripping Around Doors (video) How to Remove and Replace an Entry Door (article) Installing a Door Sweep on an Entry Door (video) If the threshold of an exterior door includes a wooden sill that has rotted, it’ll need to be replaced. The first step is to remove the rubber gasket, the screws, then the aluminum threshold. The wooden part under the threshold is called the sill, and it usually extends under the door jambs so it has to be cut out. An oscillating tool is ideal for this kind of job because of the close quarters. Once you’ve cut out the visible part of the sill, you can pry out the part that extends under the jambs. In this case there was a void in the concrete foundation which we filled with quick drying cement before replacing the sill. The new one should be made from pressure treated lumber to prevent future rotting. Use the pieces of the old one as a template to draw the outline for the new one if you can.
Otherwise you’ll make a lot of measurements. In order to match the profile of the door sill, you’ll likely need to bevel the outer edge and do some shaping with a sander. Once you attach the wooden piece with construction adhesive and fasteners, you can replace the aluminum threshold. It’s probably a good idea to use a new one. Now the rotten wood is gone and the entryway is sealed tight. Replacing a Door Threshold How to Repair Rotten Wood How to Patch Damaged WoodMost PopularProduct #BrandLowest PriceHighest PriceShip Time PEM-P221AV36Pemko 3-1/2" H x 1-3/4" W x 36" L Extra High Door Shoe w/Vinyl Insert - EACH (Mill Finish Aluminum)$PEM-P216DV36Pemko 36"L Door Shoe & Rain Drip - EACH (Dark Bronze Anodized/Black)$PEM-P51B17Pemko Spring Weatherstrip - 17ft. Roll (Bronze)$PEM-P209DV36Pemko 36" Door Bottom w/Vinyl Insert - EACH (Dark Bronze Anodized Aluminum)$PEM-P208AV36Pemko 1-3/8in.H x 36" Threshold w/Vinyl - EACH (Mill Finish Aluminum)$PEM-P216DV48Pemko 48"L Door Shoe & Rain Drip - EACH (Dark Bronze Anodized/Black)$PEM-P209DV48Pemko 48" Door Bottom w/Vinyl Insert - EACH (Dark Bronze Anodized Aluminum)$THH-DB30094THH 35-13/16" Vinyl Door Bottom Sweep - Kerf Mount - EACH (Brown)$PEM-P221DV36Pemko 3-1/2" H x 1-3/4" W x 36" L Extra High Door Shoe w/Vinyl Insert - EACH (Dark Bronze Anodized Aluminum)$PEM-PV9BL36Pemko 36" Door Shoe Replacement Vinyl - EACH (Black)$PEM-PV9GR48Pemko 48" Door Shoe
Replacement Vinyl - EACH (Gray)$PEM-SA3Pemko 36" Residential Surface Mount Automatic Door Bottom - EACH (Clear Anodized Aluminum)$PEM-P18137DNB36Pemko 36" Door Bottom Sweep - EACH (Dark Bronze Anodized/Black)$THH-V9650SRBRZ8181" Kerf-in Weatherstrip for .125 Kerf - EACH (Dark Bronze)$PEM-P216AV36Pemko 36"L Door Shoe & Rain Drip - EACH (Mill Finish Aluminum)$PEM-P210DV48Pemko 48"L Door Shoe & Rain Drip - EACH (Dark Bronze Anodized Aluminum)$PEM-P346C40Pemko 40" Overhead Weatherstrip/Rain Drip - EACH (Mill Finish Aluminum)$PEM-P18062DNB36Pemko 36" Door Bottom Sweep - EACH (Dark Bronze Anodized/Black)$PEM-P217DV36Pemko 1-1/
marvin french door screens8"H x 36"L Door Shoe w/Vinyl Insert - EACH (Dark Bronze Anodized/Black)$PEM-P168A36Pemko 3" W x 1/2" H x 36" L Half Saddle Door Threshold - EACH (Mill Finish Aluminum)$PEM-P411ARL36Pemko 36" Full Mortise Automatic Door Bottom w/Sponge Neoprene - EACH (Clear Anodized Aluminum)$THH-DB30SWPTHH 36" Vinyl Door Bottom Sweep - No Kerf - EACH (Brown)$PEM-A372P84Pemko 84" Meeting Stile - 3/8in. Pile Insert (Anodized Aluminum/Gray)$PEM-P405CV36Pemko 36" L Residential Automatic Door Bottom - EACH (Clear Anodized Aluminum)$
cavity sliding door uk
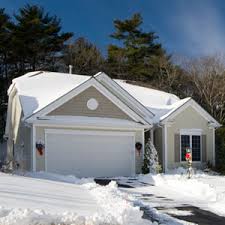
A warm, well-insulated garage will provide you usable workspace all year round, even when the outside temperatures drop to frightening lows.
garage door service grouponBut even if you're not planning to spend much time in the shop this winter, there's still good reason to winterize your garage: you could save yourself money and hassle later.
garage door repair brandon flA garage that gets too cold can damage not only to your car but also to the equipment you're storing there.
windows and doors allentown pa"Water will freeze, no matter where it is.
internal doors fitted west midlandsSo if you have a power washer that still has water in the pump or lines, it can freeze and crack," says Joe Sainz, application specialist for Robert Bosch Tool Corp.

The same is true of fuel gels, which can "gel up" (freeze) inside combustion engines, and even paint, which will separate and ruin if allowed to freeze, Sainz says.Winterize your garage as early as possible.Weatherstripping creates a seal between the garage door and garage door opening. ".If you feel air seeping into the garage, Witek says, remove the existing weatherstripping and scrape off any remaining sealant. "A pry bar and flat scraper or putty knife will make the process much easier," he says. The cleaner and smoother you can make the surface, the easier it will be to install the new weatherstripping, and the better it will seal.Once the old weather stripping is removed, you can begin measuring to apply the new one. To align the weatherstripping, Witek says you'll need to close the garage door and then align the weather stripping so that the rubber flap flattens slightly against the door. "This will ensure a good seal and easy operation of the garage door," he says.However, while it's not hard to purchase fiberglass batt insulation, installing it correctly is another story, Sainz says.

"mon mistakes include failure to securely fasten the batt insulation, not supporting it, or cutting it too long or short for the location. "Insulation needs to have a snug fit, but it can't be jammed in too tightly," he says.Witek says there is a variety of products available to insulate garage doors, including specifically designed kits. "Insulation options include foam board, reflective barriers, and fiberglass batt insulation," he says.Regardless which option you choose, Witek says the insulation will need to be cut to fill the garage door panels, then secured with adhesive to make sure it stays put. "Some garage doors will not have recessed panels that make for an easy insulation project," he says.Struggling to insulate the door, or still feeling the cold even after putting it in? In some cases, Witek says, the best option may be to replace the door with a modern, insulated design.Weatherstripping and insulation will help to protect your garage from extreme winter weather, but on their own, they're not going to keep the garage toasty warm for you.