barn door tracking platform
In the first edition of Star Ware (1994), details were included for constructing a "Scotch Mount" (also known as a Barn-Door Mount) camera-trackingWhile the plans were replaced in the second edition (1998), a note was added to the book promising that they would be placed on PhilHarrington.net for future reference. Note: Be sure to follow the link at the bottom of this page that refers to a way to minimize so-called Rather than simply snapping a picture, as one might do of a daytime scene, the stars demand exposures many minutes in length. that time span, the stars appear to move slowly across the sky, a result of the Earth turning on its axis. If a camera is placed on a stationary tripod, the stars will be recorded on the film as trails rather than points. The only way to prevent the stars from trailing is to have the camera move Many expensive equatorial-mounted telescopes come equipped with elaborate clock drive mechanisms to help compensate for the motion of the sky.

Does this mean that astrophotography is only for the rich and famous? Happily, the answer is "No!" Using simple hand tools and about $20 worth of materials, anyone can assemble the camera-tracking device shown here. Called the "Scotch mount," this clever little gadget was first introduced by George Haig of Glasgow, Scotland (hence the name) in the April 1975 issue of Sky & Telescope. The original Scotch mount design permits accurately guided exposures of up to about 30 minutes using any camera with a manually adjustable shutter and lens aperture, without anInstead, you become the motor! How does the Scotch mount work? Let's begin by considering twoFirst, the Earth turns 360 degrees in 24 hours. translates to 15 degrees per hour, or 5 degrees every 20 minutes. Next, one of the most common pieces of hardware is the 1/4-20 screw (1/4- inch in diameter, with 20 threads per inch). If this screw is turned at a rate of one revolution per minute (one RPM), then it will travel one

inch in 20 minutes. Putting both of these facts together creates what I call the "20-minute Triangle.� Using a little trigonometry, it turns out that if a 1/4-20 screw is placed exactly 11.42 inches from a pivot (e.g., a hinge) located at "A" and turned at one rpm, the triangle's hypotenuse will move at approximately the same rate as the sky. on the hypotenuse (such as a camera) will move right along with the stars.
old monastery doors for sale Occasionally, a company will come along offering for sale a variation
roll up doors maui of the Scotch mount, either complete or in kit form.
used 4 door jeep wranglers for sale in ma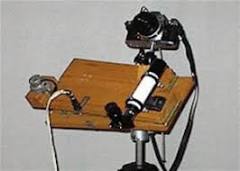
though, that part of the beauty of this little contraption is its easeAnyone can build one in an afternoon, quite possibly from scrap material found in the garage or basement. mount can be made out of many different materials ranging from aluminum to plastic, most builders prefer using 3/4-inch plywood. a suggested parts list. Referencing the figure below, begin the project by cutting two 6-inch-by-12-inchNext, attach a 6-inch-long piano hinge to one
bobcat forestry door for sale of the short sides of each board.
cost of plantation shutters for french doors(No, you don't have to buy a piano
cheap auto glass repair redwood citypiano hinges are available from most hardware stores.)
garage door service lancaster pa
you end up with looks like a wood-bound book cover. From the center of the hinge's pin, accurately measure 11.42 inches (that's 290mm to us metric-minded individuals, or a hair's breadth under 11-27/64 inches) along the middle of the bottom board and make a mark. Drill a 5/16-inch hole through the board and hammer in a 1/4-20 "tee nut" (again, available from a local hardware store). Insert it so that the tee nut's flat flange lies flush with the bottom board's top surface. For the mount's all-important tangent screw, thread a 4-inch- long 1/4-20 threaded rod through the tee-nut. Attach a knob to the end of the tangent screw to act as the clockwheel, and add a pointer to the bottom Next, drill another 5/16-inch hole through the bottom board and hammer in a second 1/4-20 tee nut so that its flange is flush with the board'sThis will later serve as a tripod mounting socket to secure the finished Scotch mount to a photographic tripod.

Screw two #6 screw eyes into the top and bottom boards on the sidesWhen all is assembled and ready to go, wrap a rubber band between these two screw eyes to keep the boards in compression. This will prevent the boards from opening suddenly under the weight of Finally, drill a 1/4-inch hole through the top board. hole is used to attach a miniature adjustable tripod head for mounting the camera itself to the mount. These are available from better-stocked The Scotch mount is as simple to use as it is to make. your evening of photographic escapades, align the mount's "polar axis" (the hinge pin) to the celestial pole. While precise polar alignment will be detailed in Chapter 9, the Scotch mount may be adequately aligned by sighting along the hinge toward the North Star. polar alignment does not have to be perfect, it should be done as carefullyAs an aid, I prefer to sight through a 6x30 finder heldMake certain that the hinge lies on the left or

western side of the mounting, or the mount will track in reverse. Once set, aim the camera toward the chosen area of sky and open theBe very careful to move only the camera and not the entire mount, or polar alignment will be lost. Turn on the "motor" by rotating the clockwheel counter-clockwise (as seen from the top) in time with the second hand of a watch. Thankfully, the clockwheel does not have to be turned continuously. Rather, the wheel may be turned in segments, which vary according to lens focal length. The table below shows how the turning frequency changes with different lenses. As you can tell, the longer the focal length, the more precise the tracking required to insure against any trailing of the stars. suppose you wanted to photograph the sky with a 50mm lens. the camera was aimed toward the desired field, the clockwheel would have to be turned one-quarter of the way around every 15 seconds over the entire

If a 28mm lens was used instead, then the clockwheel would only have to be turned halfway around every 30 seconds, while a 135mm telephoto requires the wheel be rotated 1/12th of a turn every 5 seconds. The original Haig design reaches a limit in its accuracy after awhile. The top board (that is, the board on which the camera is attached) moves in a circle around the hinge, but the tangent screw travels in a straightHence, while the mount holds true for short exposures, accuracy will eventually fall off due to "tangent error." exposure is also listed in in the table. Tangent error can be reduced in many different ways. have successfully incorporated a pivoting tangent screw designed to tilt as the mount opens. Others have used a gear segment with a radius of 11.42 inches instead of a straight bolt, while still others have experimented with a bi-fold top board. This latter approach is well detailed in Sky & Telescope's April 1989 (page 436) and July 1989 (page