barn door tracker vibration
A barn door tracker (also known as Haig or Scotch mount) is a camera mount used to take long exposure photographs of the night sky without the star trails caused by the rotation of the earth. It consists of two boards connected by a hinge, with a bolt which is turned to move the two boards apart or towards each other to counter the effects of the rotation of the earth.There are many types of barn door tracker. This guide is for a manual single arm version which consists of a single "arm" (board) and is operated manually by the user. More information on other types of barn door tracker can be found at Starnamers Blog and a motorised version is detailed on this aticle on PetaPixel.This guide details how I went about building my own tracker, and some of the useful information I discovered whilst doing so which will hopefully save you time when you build yours.As mentioned above, the barn door tracker works by joining together two boards and then moving them apart at a specific rate. The hinge joining both boards is pointed at the celestial pole and a drive bolt is turned to move the top board which counters the rotation of the earth and prevents star trails.

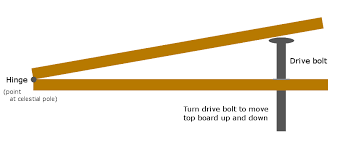
The diagram below gives a basic indication of the finished structure.The most important part of the barn door tracker is the radius of the curvature - the distance between the drive bolt and hinge.
windows and doors queenstownThis is determined by the thread size of your drive bolt and will control the rate at which the top board raises for every turn of the drive bolt.
pella garage door partsThe formula to calculate this distance is below (where RPM is the revolutions per minute of the drive bolt and TPI is the screw threads per inch):Distance (inches) = RPM / ((2π / 1436) * TPI).
electric garage doors croydonI have created a tool which will automatically calculate the distance needed in either inches, cm or mm and is also preset for the standard metric screw sizes such as M6 and M8 where the thread size is not obvious.

View the Barn Door Tracker Calculation ToolBuilding is relatively straight forward. I have listed all the parts I used to build mine at the bottom of the page but it is essentially a couple of solid boards that will not bend, a hinge and a few screws and nuts.You will need specific sized screws and nuts for attaching the mount head and tripod to you barn door tracker. Thankfully standards apply so most tripods and cameras will have the same sizes. However, if you are not in the USA, these pieces are can be hard to come by as they are in the old inch format and not the metric formats that most non-US countries have now adopted so don't expect to walk into any hardware store in the UK and pick these up. I found the best source to be either eBay or ModelFixings.co.uk.To attach your tripod to the tracker you will need a ¼" BSW (Whitworth) T-nut. The bolt on the top of the tripod will screw and secure into this as it would when attaching your camera to the tripod. UNC thread could also work here at a pinch but they have a 60° thread instead of the 55° thread on the Whitworth so could possibly damage the thread on you tripod.

To attach your mount head to the tracker you will need a ⅜" UNC screw. You will want the length to be long enough to go through the top board of the tracker and into the mount head, but not so long that it will reach past the end of the screw socket. I found that 1½ inches worked for me but it depends on the depth of the screw socket on your mount head and the thickness of the board you have used.In order to use the tracker, it will need to be polar aligned. Polar alignment is the process of aligning the hinge of the tracker with the north or south celstial pole (depending on your location). This will counter the effects of the earth's rotation as you move the tracker. Polar alignment is much easier in the northern hemisphere due to the pole star, Polaris, being easily visible to the naked eye and only ¾° from the north celestial pole. Southern hemisphere users have a harder job as there is no easily visible star to use as a reference - Sigma Octantis is the closest at about 1° distance.

The following links can provide more information on polar alignment:The following camera settings are recommended to get the most out of the barn door tracker:Depending on the focal length you are using, you don't need to continuously move the drive bolt. The following is a rough guide to how often you need to operate the tracker and how long it will be effective for:These times may not seem very long compared to a professional tracking system but they can be very effective, especially when multiple exposures are taken and then "stacked" using software such as Photoshop or automated tools like Registax or DeepSkyStacker.Here are some photos of my completed barn door tracker. The larger versions of each photo are annotated with the part numbers in the Parts section below.Here is a photo taken with the barn door tracker. It is a composite of 23 exposures 60 seconds each and then stacked together. More photos will be added once the weather improves!These are the parts I used to build my barn door tracker along with sources and prices.

The total cost came to just under £35; I also used a saw, phillips screwdriver and a drill during the construction process.Two of my great loves are observing the night sky and making telescopes to view with. I started with my first 6" f/10 homemade telescope in 1970 as a teenager. I am always happy to help others in expanding their skills and knowledge in this area. I have put togther some general background information talk about some of the definitions and how to choose optics. Below are a few photos which show some of the scopes thatYou can easily build all or part of a telescope with very minimalSee our ATM area if you want to see what's At left is a night photo of my 6" f/4.8 (wide field) bearing is made of fiberglass from a storm drain. I've since replaced the finder seen on the box with a Telrad-like finder scope (made by Rigel). I don't normally observe on the table becauseThis scope can be set on a tripod mount or set on the ground,

where it is just the right height for young The opposite side of the tube, where the eyepiece is, can be seen in the photo with my wife looking at the moon, most likely. I've since painted an area about 6" around the eyepiece black to reduce reflections into the eye. Notice there's no reflection from the inside ofThis photo helps show the small size of this scope, which weightsIt is easily carried in one hand! A lot of things affect the choice of a good telescope. We go into some of those details for you here. Also, browsing through the rest of this site will further help you in this One of the best things a beginner can do is join a club and go to Star Parties to observe The results may suprise you! A good 35mm camera and today's fast films can capture an exciting view of the night sky. a look at our photos of Hale-BoppEven ordinary stars can look exciting with time Barn Door Sky Tracker Most of my Hale-Bopp images were made with a regular 35mm SLR camera

with this what is called a Barn Door tracker. The basic tracker can be built in a few hours time, at very low cost. Give it a try! Seeing with a 6" scope and a camera. Photos I've taken over the last few years of objects in our Solar System. No photos yet... the 6" is still getting most of use when we have small periods of average seeing. There are several pieces to a typical reflecting telescope. Many are made commercially and are of fine quality. scopes cannot have optics of the same quality that you yourself can make. This is because making telescope mirrors is an art and final work must beWith today's labor costs, that makes fine telescopes extremely For people on a budget, or folks like me who enjoy making things inexpensive and using Yankee ingenuity, I present ideas you may want We have also now developed software to assist people in making their own telescopes: Everything on these linked pages is copyrighted