barn door hinges uk

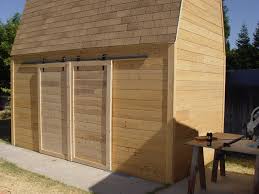
Installing a Shed Door Your beautiful and functional new shed is finally installed, and now you are on to the finishing touches—the doors. Your shed door will keep your lawn and garden equipment safe and secure, but only if they are installed properly. Use these steps in order to get your shed doors installed quickly and efficiently. To ensure that your doors will fit properly, it is important to measure both the top and bottom of the opening. Both portions of the opening should be the same length, ensuring that the space is square. If the space is not square, you’ll need to make some adjustments to ensure that the doors will be aligned correctly. Install a Ledger Board It is recommended that before you install your shed door or doors, that you install a ledger board one inch below the floor of your shed. This ledger board should be parallel to and level with the floor, and it will be useful when it comes to putting the door into its proper position. Depending on the type of garden shed door that you’ve purchased, the hinges may or may not already be installed.

If they are not, you’ll need to do this step on your own. To install the hinges, complete the following steps: Place the hinges in the right location. Most doors require at least two hinges: one located about 7 inches from the top of the shed door frame, and the other located about 11 inches from the bottom of the shed door frame. If you have a third hinge, you’ll place it directly in the middle of the two other hinges. This is a good idea if you have a heavy door. Trace around the hinge. After you have measured the right location of your hinges, use a carpenter’s pencil to trace around the hinge. You will then use a box cutter to score the outline so that you can more easily cut the mortise in the next step.To make room for the hinge, you’ll need to cut out a portion of the wood in the shape of the hinge. You’ll need a hammer and a sharp chisel to cut and carefully remove the wood. Mark where the screws will go. Once the mortise has been removed, replace the hinge and use a pencil to mark where the screws should go.

Then, remove the hinge again to drill pilot holes in those locations. This will make it easier for you to put the hinges in place.Use a screwdriver to screw each hinge into its correct position on the door. Putting the Door in Place Once your doors are prepared with hinges in their proper positions, it is time to put the door in place. In order to accommodate lawn equipment and outdoor gear, most garden sheds will have two doors that will need to be installed.
bi fold doors drainageFollow these steps to get them both into proper position:
glass shower door drip tray Start with the left door, place it on the ledger board, and move it all the way to the left
sliding doors for sale builders warehouse
Screw the hinges to the outside door style. Set the right door on the ledger board, moving it all the way to the right (there should be a ¼ inch gap between the two doors). Screw the hinges of the right door to the outside door style. Choose the Right Shed Lock In order to give your shed added security, it is important that you select the right lock for your doors. For an unframed shed door, there are three main types of locks to choose from, all of which are fixed onto the central door ledger:
2 door tahoe for sale los angeles Hasp and staple latch.
garage doors fitted leicesterNot only is the hasp and staple one of the most versatile latch options available, they are also easy to install.
steel door frames adelaide
A padlock is often used along with the hasp and staple latch in order to provide added security to shed items. Just remember to always use tamperproof bolts or screws when installing your lock.This lock is fitted to the surface of a door and has a matching box that is fitted into the door jamb. The benefit is that there is nothing removable from the outside. Once your doors have been installed, you can remove the ledger board from below them. Your garden shed is now ready to keep your outdoor equipment safe and secure.
car door latch stuck in closed position Do you need more help installing your shed doors? Check out some of these helpful resources for additional guidance. – How to build and install barn doors for your shed. – How to fit a door handle on your own. – How to measure for the right fit for your door. – If you want to add a lock to your shed doors, follow these tips.
– How to properly place the hinges on your shed door. – How to mortise a door hinge. « « Finishing the Roof Staining or Painting the Siding & Trim » »To photograph the stars, you need a gadget that can track the revolving night sky in a perfectly timed arc. Otherwise all you’ll see is streaks and blurs. You can buy fancy motorized “equatorial mounts” for telescopes and cameras, but it’s way cheaper and more satisfying to build your own simple “barn door” tracking mount using a long bolt or threaded rod as a drive screw. You mount your camera on the “door,” then aim the hinge straight at the North Star, Polaris. The motor opens the door very slowly to match the sky’s rotation, for blur-free exposures of minutes or even hours. You can set the speed using a microcontroller or a simple circuit. But there’s a catch: A straight drive screw turned at a constant rate won’t produce a constant angular motion. It’s called the “tangent error” — and here’s how some of our favorite DIY barn door trackers solved it.
Sky & Telescope contributing editor Gary Seronik of Victoria, British Columbia, built a lightweight, portable tracker that drives a simple 4RPM DC motor with an adjustable voltage regulator to dial the rotation rate, and a curved bolt to reduce tangent error. He’s shared his design and schematics in this great tutorial. “It’s hard to beat a DC motor and simple regulator circuit for simplicity and performance,” he says. Seronik went on to create an even more compact Hinge Sky Tracker using an 8″ strap hinge in place of the plywood doors. A straight bolt introduces tangent error, but he solves that by taking shorter exposures and “stacking” them in freeware called DeepSky Stacker. » For the best of both worlds, build Seronik’s new motorized Hinge Sky Tracker, with a curved bolt, DC motor, and regulator circuit. Find the project here. Chris Peterson in Guffey, Colorado, used a straight bolt in pivoting mounts and cleverly programmed a Freescale/Motorola 68HC705C8 microcontroller to drive a 1.8° stepper motor at a variable rate to produce constant angular motion.